Newborn Retouching: The Gentle Art of Baby Skin Editing

If you're searching for professional newborn skin retouching for photographers, chances are you already know the challenge: newborn skin is unlike any other subject you'll ever edit. It blushes, peels, breaks out, and carries the marks of a very recent arrival into the world. Whether you handle editing in-house or are considering outsourcing newborn photography editing services to free up your shooting schedule, understanding what great newborn retouching actually involves is the foundation of delivering images your clients will treasure for a lifetime. And for photographers looking to establish a natural-looking baby skin retouching workflow, this guide walks you through every stage — from first import to final export.
Why Newborn Retouching Is Its Own Discipline
Newborn photography retouching is not simply "beauty retouching, but smaller." The subjects, the goals, and the ethics are entirely different. A newborn's skin may show baby acne, milia, erythema toxicum, jaundice, peeling, or the lingering marks of birth. None of these are flaws in any meaningful sense — they are the natural textures of new life. The retoucher's role is not to erase the baby's reality, but to gently calm distractions so the emotion of the image can breathe.
This requires a lighter touch than commercial beauty retouching, a deeper understanding of skin physiology, and a strong sense of what parents actually want when they look back at these images in twenty years. They want to remember their baby — not an airbrushed ideal.
The best newborn retouching makes parents say "that's exactly how I remember them." Not "they looked so perfect." Perfect was never the point.
The Core Challenges of Newborn Skin Editing
Before diving into technique, it helps to understand what you're actually dealing with. Newborn skin presents a cluster of common challenges that every retoucher in this niche will encounter regularly.
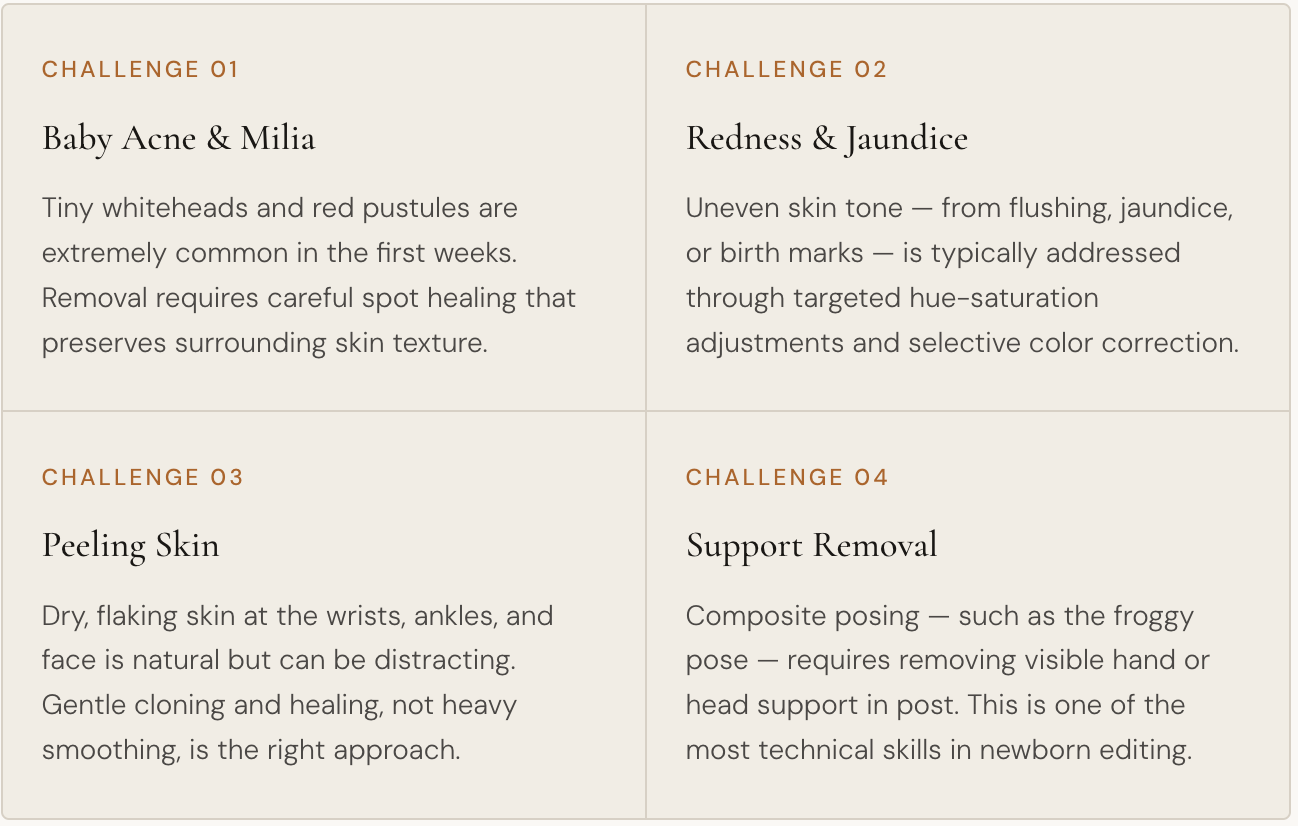
Composite posing — such as the froggy pose — requires removing visible hand or head support in post. This is one of the most technical skills in newborn editing.
A Natural Newborn Retouching Workflow
The most important principle of a good newborn retouching workflow is sequencing. Trying to fix skin tone before your exposure is correct, or cloning out marks before your composite layers are merged, creates rework and inconsistency. Here is a professional sequence that keeps your edits clean and reversible.
Stage 1 — Global corrections
Begin in Lightroom or Capture One with white balance, exposure, and basic color correction. Newborn sessions are often shot in warm, soft window light or studio strobes, and getting the base color right before moving into Photoshop saves significant time on skin tone work later. Pay particular attention to the whites of the wraps and props — they're your most reliable reference point for neutral tone.
Stage 2 — Composite work
If the image involves composite posing — froggy pose, chin-on-hands, or any position where a parent's hands are providing support — this layer work must happen before any skin retouching. You cannot retouch across a layer boundary that doesn't yet exist. Merge and flatten your composite elements on a dedicated layer before proceeding.
Stage 3 — Spot healing and cloning
Work through baby acne removal, milia, and any visible peeling or scratches using the healing brush and clone stamp. Keep your sample sources nearby in tone and texture. Avoid over-healing — the goal is to reduce visual noise, not to produce porcelain skin. One pass is usually sufficient; resist the urge to go back over the same area repeatedly.
Stage 4 — Skin tone evening
Use a combination of hue-saturation adjustment layers with luminosity masks to calm uneven redness or jaundice. For jaundice specifically, a targeted reduction of yellow in the skin tones — rather than a global shift — gives the most natural result. Color balance adjustments in the shadows can also help neutralize the greenish cast that sometimes accompanies jaundice correction.
Stage 5 — Dodge & burn
A light pass of dodging and burning shapes the light on the baby's skin and brings out the soft dimensionality that makes fine art newborn portraits sing. Unlike portrait retouching for adults, the dodge and burn values here should be extremely subtle — 3 to 5% opacity on your dodge and burn layers is often enough.
Stage 6 — Final grade
Apply your signature color grade — whether that's soft and airy, warm and creamy, or moody and fine-art dark. Consistency across a full gallery is what separates a professional delivery from a patchwork result. Save your grade as a Lightroom preset or a Photoshop action so it can be applied uniformly.
Should You Outsource Your Newborn Editing?
This is the question every growing newborn photography studio eventually faces. Editing is time-consuming — a full newborn session can take anywhere from three to six hours to retouch properly. For photographers shooting multiple sessions per week, that editing time quickly becomes the ceiling on growth.
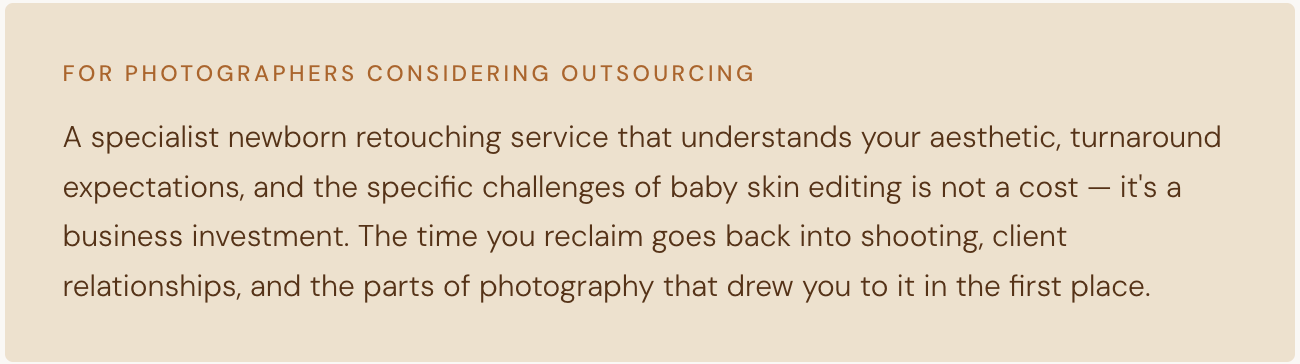
The key to successful outsourcing is communicaA new retouching partner needs to understand your style before they can replicate it. Provide before-and-after examples from your portfolio, specify your skin tone preferences, detail your composite requirements, and set clear turnaround expectations from the start. The best outsourcing relationships function like a true photographer's assistant — invisible, reliable, and always in service of your vision.
Batch Editing for Newborn Sessions
Even with a strong single-image workflow, the economics of newborn photography require thinking in batches. A typical session delivers 50 to 80 final images, and each one needs to feel cohesive with the others. Batch editing for newborn photography sessions relies on a smart culling and selection process first — identifying your hero images, your lifestyle shots, and your detail images, and applying appropriate base edits to each category before diving into individual retouching.
Synchronizing your Lightroom edits across images shot in the same lighting setup, then exporting only your selects to Photoshop for detailed skin work, is the most efficient path through a large gallery. Tools like Lightroom's Reference View and Capture One's Copy Adjustments function are invaluable here.
The Ethics of Newborn Retouching
Any serious conversation about newborn retouching has to include its ethical dimension. Unlike commercial photography, where heavy manipulation has a long and accepted tradition, newborn photography exists in a deeply personal, documentary space. Parents are entrusting you with the record of one of the most significant moments of their lives.
Body-altering edits — changing the shape of a baby's features, removing birth marks with deep sentimental meaning, or creating an overall look that doesn't reflect how the baby actually appeared — cross a line that most professional newborn photographers and retouchers won't approach. The standard in this niche is clear: enhance, calm, and refine. Never fabricate.
Retouching newborn images is an act of care — for the baby, for the parents, and for the truth of the moment you were trusted to preserve.
Finding the Right Newborn Retoucher
Whether you're building an in-house post-production skill set or evaluating an external service, the markers of a great newborn retoucher are consistent: their before-and-afters show restraint rather than heavy-handed smoothing; their skin tones look warm and alive rather than flat; their composite work is seamless; and their turnaround is reliable enough to build a business on.
Ask to see examples across a range of skin tones. Ask how they approach baby acne versus peeling skin. Ask what their process looks like when a composite doesn't work and needs to be redone. The answers will tell you everything about whether they truly understand this genre — or are simply applying generic retouching skills to a specialised problem.
Newborn photography retouching, done with genuine skill and sensitivity, is one of the most rewarding niches in post-production. The images you help bring into their final form will hang on walls, live in albums, and be passed down through families. That's not a small thing — and it deserves the craft to match.
Related reading